
This apron uses one yard of 45″ wide fabric and can be made with
a simple straight stitch machine. It is a perfect beginners sewing
project for learning straight stitching, measuring and pressing.
Cutting Directions
Measure and mark as shown in diagram. Cut on blue lines.
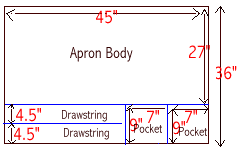
Apron Body – 45″ by 27″ piece
- Stay stitch 1/4″ from all edges.
- Using the stay stitch line as a guide, turn and press the 1/4″
to the wrong side, on all edges. - Sides- 27″ Edges
Turn under 1″ and press. This
forms the side hem. Pin and top stitch. - Bottom – 45″ Edge
Press under 2″, to the wrong
side, for the hem. Line up ends, pin and top stitch. - Top – 45″ Edge
Press under 3.5″ to wrong side. Line
up ends and pin in place. Top stitch along 1/4″ stay stitched
edge, keeping your stitches as close to the edge as possible. Top
stitch 1″ from the top folded edge. This forms your drawstring
casing.
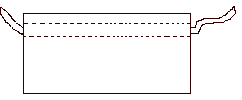
Tie Belt – two 4.5″ by 31″ strips
- Join two strips on a 4.5″ edge using 1/2″ seams. Press the
seam allowance to one side. - Fold strips length wise,right sides together, matching long
edges and ends. - Stitch as in diagram, using 1/4″ seam allowances, leaving 4″
in the center open for turning.

- Turn right sides out. Make sure to push the corners square.
Press under seam allowance at the area you left open for turning.
Press tie belt. - Top stitch 1/4″ from all edges, pivoting your stitching at the
corners.

- Use a safety pin to thread the drawstring through the casing.
Pockets – two 9″ by 7″ pieces
- Stay stitch 1/4″ from all edges.
- Press under using 1/4″ stitch line as a guide. Fore a neater
appearance use mitered corners. - On top edge of pocket (a 7″ edge. Press under 1 1/2″ for
pocket hem. Top stitch into place. - Repeat for second pocket.
Attaching Pockets To Apron Body
- On apron body, measure 15″ in from side edge and 6″ up from
hemmed edge.
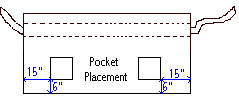
- Top stitch pockets into place, stitching 1/4″ or closer from
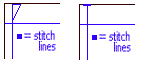
pocket edge. - For added strength at the top of the pockets: stitch 2 to 3
stitches along the top edge and pivot your stitches to stitch at
an angle and return to your side row of stitches or bar tack at
the top edges.
Ideas For Advanced Sewing And Embellishment
Use your
creativity to make your apron personalized. Heart shaped pockets can
be made by stitching two hearts together, turn right sides out and
then top stitched in to place in stead of square pockets. Embellish
the pockets with lace, trim or ric rac. Use a complimentary
contrasting fabric for the tie belt and pockets.